Customizing Your Camera
Camera User Menu
- To enter the user menu, double press the FN button while the camera is on Standby mode.
- Press the Scroll Up or the Scroll Down button to select the required option from the menu.
- Then briefly press the FN button to select the function.
- Use the Scroll Up or the Scroll Down button to select the right function configuration. Once selected, the menu will now go back to the function selection page.
- To exit the user menu, double press the FN button.
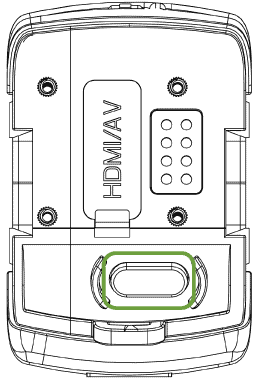
Double Press

Scroll Down
Scroll Up
Resolution
Choose the video recording resolution and the sampling frequency (FPS) that suits you best:
- 2560 X 1440 @ 30FPS
- 2304 X 1296 @ 30FPS
- 1920 X 1080 @ 60FPS
- 1920 X 1080 @ 30FPS
- 1280 X 720 @ 60FPS
- 1280 X 720 @ 30FPS
- 848 X 480 @ 60FPS
- 848 X 480 @ 30FPS
Loop Recording
Choose if you would like that once the memory card is full, the ongoing recorded data would overlap the earliest recorded data in the SD Card:
- On – Overlap the earliest recorded data.
- Off
Auto IR LED
The camera can automatically switch from day (color recording) to night recording mode (monochromatic, using integrated IR LED’s) utilizing its ambient light sensor. In case selected off, the camera can be turned from day to night modes manually by a short press of the FN button. You can choose the option you prefer:
- On – for automatic switching between day and night recording.
- Off
WIFI
Select the WIFI interface for your camera to connect wirelessly to;
- App On - for IOS/Android interface
- STA On - for PC interface.
- Off
GPS
The built-in GPS records the camera location to be later viewed through dedicated video and location players. Choose to turn the function on or off;
- On - for GPS location (embedded in the recorded meta-data).
- Off
Sound
The camera has audial indications, choose if you prefer it to be active or turned off.
- On - for active audial indications.
- Off
The sound indications are as follows:
- General function On – one beep is sounded.
- General function Off – two beeps are sounded.
- Camera On – "camera on" is enounced.
- Camera Off – "camera off" is enounced.
- Snapshot – a "click" sound indication.
- Low battery – When the camera battery level reaches 5%, "low battery" is enounced.
- Low Data Storage – When the camera memory level descends to 200MB, "card full" is enounced.
LED
The camera has status indicator LEDs. Choose if you prefer it to be active or turned off;
- On – for active LED Indication.
- Off
The Status indication LED are as follows:
- Still Green: standby mode.
- Flashing Red: video recording.
- Flash once (red): taking a photo.
- Still Orange: waiting to be reset with reset button after FW version download.
The Charging indication LED are as follows:
- Still Red: charging status.
- Still green: the camera is fully charged.
Vibration
The camera has function status vibration indications, choose if you prefer it to be active or turned off;
- On – for active vibration Indication.
- Off
The Vibration indications are as follows:
- General function On – One vibration boost.
- General function Off – Two vibration boosts.
- Camera from off to on and start recording - One vibration, a pause and additional one vibration.
- Camera on to standby – one vibration boost.
- Camera Off – Three vibration boosts.
Note: At Covert Mode, the vibration indication is working unless switched Off. Please take into consideration that while in Covert Mode and with vibration turned off, it would be impossible to determine camera status unless the covert mode is turned on again.
Format Card
By using this function, you can delete all the information stored in the camera Micro SD card. Choose the option to do or not to do;
- On – would format the camera SD card. And the camera would turn Off.
- Off
Streaming Resolution
Choose the video streaming resolution and the sampling frequency (FPS) for the APP WI-FI interface;
- 1280 X 720 @ 30FPS
- 1280 X 720 @ 15FPS
- 848 X 480 @ 30FPS
- 848 X 480 @ 15FPS
- 640 X 360 @ 30FPS
- 640 X 360 @ 15FPS
- 320 X 240 @ 30FPS
- 320 X 240 @ 15FPS
Screen Save
The camera has an LCD Screen Save mode, choose if you prefer that the LCD Screen saver would be active or not;
- On
- Off
IR LED
This function determines whether the integrated IR LEDs would be turned on or not in the night mode recording. In the case where you prefer to illuminate the scene with external IR
- On – records with the camera integrated IR illumination.
- Off – the camera integrated IR Illumination would not be active at night recording.
Pro Tip: A short press on the FN button will turn On the IR illumination