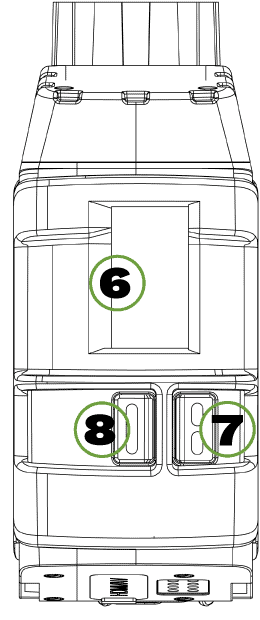
Camera Overview
1. SD-card slot
- The MicroSD card slot is located under the flexible cover at the bottom of the camera.
- You can use any MicroSD card with a capacity of up to 128GB.
- The camera comes with a 32GB MicroSD card (Inside the camera).
2. Reset Button
- The Reset Button slot is located under the flexible cover at the bottom of the camera near the SD card slot.
- To reset your camera press and hold the reset button with a thin object.
Note: use the reset button only if the camera freezes up or works abnormally.
3. 1/4” nut
- Standard tripod bolt interface.
4. Status indication LED’s
- Still Green: standby mode.
- Flashing Red: video recording.
- Flash once (red): taking a photo.
- Still Orange: waiting to be reset with reset button after FW version download.
5. Battery charging indicator LED’s
- Still red: Charging status.
- Still Green: The battery is fully charged.

6. LCD screen
Full battery
Low battery
Battery Charging
Not Charging
Snapshot Available
Snapshot Taken
IR Light On
IR Light Off
Recording (Flickering)
Recording Stopped
Sound On
Sound Off
GPS Connected
GPS Off
WIFI Connected
WIFI Off
7. Snapshot/ Covert Mode/ Scroll up Button
Snapshot
- Either when the camera is at standby mode or in recording video mode:
- Short press the snapshot button to capture a photo
Covert Mode
- Long press the snapshot button for 3 seconds to enable covert mode. Both LED, LCD & voice indications will be disabled. Camera functions would be indicated by vibration: start recording vibrates once, stop recording vibrates twice.
- Long press the snapshot button again for 3 seconds to disable covert mode.
Scroll up Button
- When the camera is at menu mode:
- Short press to scroll up the menu options.
8. Power On/ OFF/ Video Recording/ Scroll Down Button
Power On/ OFF
- Short press on the power button will power the camera and automatically start the video recording.
- Long press on the power button will turn the camera on. After that, the camera will enter standby mode.
- Long press on the power button again will turn the camera off.
Video Recording
- When the camera is at standby mode:
- Short press the record button to start video recording, recording initiates with audio prompt (Recording start), Status Indicator LED (Red recording indicator flashing) and camera vibrates once.
- Short press the power button to stop the video recording. Status indicator LED turns still green and the camera vibrates twice.
Scroll Down Button
- When the camera is at menu mode:
- Short press to scroll down the menu options.

9. Mechanical Secured Adaptor
- Direct to helmet or rifles (By PICATINNY & ARC Adapters).

10. Camera Lens
- 110º Field of View (and other optional FOV lenses)
11. Infrared Illumination LED’s
- Short press the FN button once to turn on the IR Illumination.
- Short press it again to turn IR Illumination Off.
12. Visible White Illumination LED’s
- Long press on the FN button to turn on the white illumination.
- Long press again to turn the white illumination Off.
13. Light Sensor
- Detection of ambient light status to automatically turn IR illumination when selected at the menu.

14. HDMI/AV Port
- While recording interface to a display/ streamer/ tactical.
15. Pogo Pin Interface Connector
- Connection interface to docking/external interfaces cable for:
- USB interface.
- AV video interface.
- 5V external power source interface.
16. Fn button
When the camera is at video recording mode or standby mode:
- Long press to turn infrared illumination On/Off.
- Short press to turn visible white illumination On/Off.
When the camera is at standby mode:
- Double press to enable camera menu mode.
When the camera is at Menu Mode:
- Short press to select the function.
- To exit the menu mode, double press the FN button.

Docking Station
The Docking Station is the data interface and the camera battery charging interface.
17. Status Indication LED.
18. Mini USB cable socket.
